How to Clean Stains: 8 Essential Strategies for Every Fabric and Surface
The best first step to treat any stain is to act quickly by blotting, not rubbing, to prevent it from setting. Using a color-safe solution like 3% hydrogen peroxide can help lift fresh stains on most fabrics before deeper cleaning. Understanding how to clean stains is important for homeowners, renters, and parents who want to restore clothing and household items effectively.
This article helps you identify stain types and select the right cleaner while offering practical strategies for common tough stains using household products. You’ll also learn fabric-specific care tips, build a stain removal kit, and avoid mistakes that waste time and damage fabrics.
Key Takeaways
- Blot fresh stains immediately with a clean cloth and avoid rubbing to stop the stain from spreading.
- Test hydrogen peroxide on a hidden area for color safety before pre-treating stains on washable fabrics.
- Use a 50/50 vinegar-water solution to loosen grease stains before treating with dish soap.
- Pre-soak non-color-safe clothing in warm water with detergent and borax for 30 minutes before washing.
- Spray WD-40 on stubborn grease stains, wait 30 minutes, then apply dish soap for best results.
- Soak slime stains in 2 gallons of hot tap water before rinsing to break down residue.
1. What Is the Best First Step to Treat Any Stain?
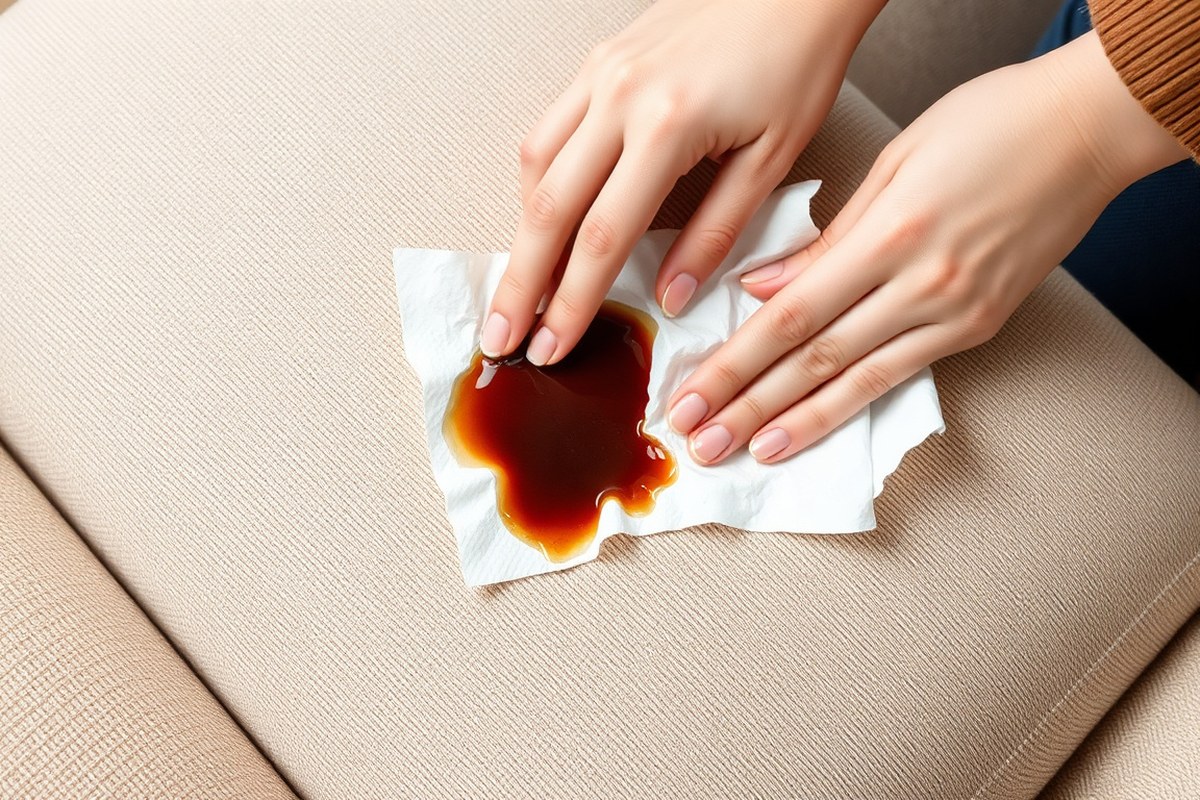
Acting quickly after a stain appears significantly increases the chance of fully removing it. The best initial response is to gently blot, not rub, the stain to avoid pushing it deeper into the fabric or spreading it to a larger area. Pure cold water is usually the safest first step for most fabrics, as heat can set many stains permanently. Some delicate fabrics require extra caution and might need specialized immediate treatment or professional care. Here is a step-by-step approach to handle fresh stains right away:
- Identify the fabric’s care instructions. Check labels for washing recommendations and sensitivity to heat or chemicals to avoid damage.
- Remove any excess solid or liquid. Gently scoop or blot away as much of the spill as possible without rubbing it in.
- Blot the stain gently with a clean white cloth or paper towel. Use a pressing motion and switch to a clean area of the cloth frequently to lift the stain without spreading it.
- Lightly dampen the cloth with cold water and blot again. Cold water works well for most fresh stains, including blood and beverages, without setting them; avoid hot water.
- For tougher stains or specific types (like grease, ink, or grass), apply an appropriate mild solution. For example, mix equal parts white vinegar and cold water to treat grease or grass stains on leather or fabric. Always test on an inconspicuous spot first.
- Blot with a clean cloth moistened with plain cold water to remove any cleaning solution residue. This step prevents leftover solution from causing marks or damage.
- Allow the fabric to air dry or proceed to wash according to care instructions. Avoid heat in drying until you confirm the stain is gone, as heat can set stains permanently.
Some fabrics such as silk, wool, and leather require extra care during this immediate treatment to avoid damage. Instead of rubbing, always blot gently and consider using milder or fabric-specific solutions. For leather, for example, use diluted vinegar solutions applied with a damp cloth and avoid saturating the material. If stains appear on delicate fabrics and you’re unsure of the treatment, consulting a professional helps prevent costly mistakes.
2. How to Identify Stain Types and Choose the Right Cleaner

Identifying the type of stain you’re dealing with is key to successful stain removal. Stains fall mainly into five categories: oil-based, protein-based, water-based, dye-based, and combination stains. Matching each stain type to the right cleaner or solvent ensures the stain breaks down without damaging your fabric or furniture.
Oil-Based Stains and Treatments
Oil-based stains come from grease, cooking oil, makeup, or petroleum products. They look shiny or greasy and need solvents, not just water or soap. Mineral spirits, turpentine, or commercial oil stain removers work best because they dissolve oils. Avoid using water-based cleaners first, or you risk setting the stain deeper.
Before applying solvent, place cardboard behind fabric to catch dissolved oil and use a clean cloth to dab, not rub, the stain. This lifts oil away without spreading it. For carpets or upholstery, test solvents on a hidden spot first to avoid damage.
Protein-Based and Enzyme Solutions
Protein stains come from blood, grass, sweat, or many foods. Enzymatic cleaners break down proteins effectively, turning tough stains into easier-to-remove substances. Use mild acids or enzyme detergents, but don’t use hot water because heat can cook protein into fabric fibers, making stains permanent.
Apply enzymatic cleaners generously and let soak for 15 to 30 minutes before rinsing with cool water. These cleaners are safer and less harsh than solvents, making them a good choice for food and bodily fluid stains on clothes and upholstery.
Water-Based Stains and Mild Cleaners
Water-based stains often come from beverages like coffee, juice, or wine, as well as mud and some paints. They aren’t greasy and usually have a flat appearance. Mild detergents or water-soluble stain removers work well here. Warm water combined with gentle cleaners can lift and rinse out these stains.
For delicate fabrics or upholstery, use a water-based cleaner that won’t leave rings or marks. Check product labels for “water-based” and avoid harsh solvents, which may damage the color or fabric. For pet stains, specialized enzyme cleaners perform better since they specifically target organic matter.
Handling Combination and Complex Stains
Combination stains contain both oil and water elements, like ketchup, salad dressing, or makeup mixed with sweat. These are tricky because treating one component incorrectly can worsen the other. Start by blotting excess residue without rubbing.
The right approach is a multipurpose stain remover, often enzymatic and mild solvent-based, that tackles both parts. Always test removers on inconspicuous fabric patches first. For older stains, gently apply warm water and an enzymatic cleaner, then treat any greasy portion with a solvent once dry.
| Stain Type | Typical Origins | Recommended Cleaner | Water Temperature | Warnings |
|---|---|---|---|---|
| Oil-Based | Grease, makeup, cooking oil | Solvents like mineral spirits, turpentine | Cold water to avoid setting stain | Do not use water-based cleaners first |
| Protein-Based | Blood, grass, food stains | Enzymatic or mild acidic cleaners | Cool or cold water only | Hot water sets stain permanently |
| Water-Based | Coffee, juice, mud, some paints | Mild detergents or water-based cleaners | Warm water recommended | Harsh solvents may damage fabric |
| Dye-Based | Ink, dye, water or oil-based paint | Rubbing alcohol, nail polish remover | Depends on product instructions | Test first; may remove fabric color |
| Combination | Ketchup, salad dressings, makeup plus sweat | Enzymatic plus mild solvent cleaners | Usually cool to warm water | Treat each component carefully |
Using one remover for all stain types rarely works well. Water-based products won’t dissolve oil stains, and solvents can damage delicate protein stains. Combining different cleaners on complex stains produces better results but requires caution. Always follow labels and try spot tests before full application.
Using hot water on protein-based stains like blood often cooks the stain into fibers, making it much harder to remove.
3. How to Remove Common Tough Stains with Household Products
Removing tough stains from everyday fabrics often requires specific household products and timed treatments to avoid permanent damage. Targeted steps for each stain type, including ink, grass, blood, grease, red wine, coffee, and mud, can clear the stain effectively without harsh chemicals or costly products.
Ink and Permanent Marker Removal
Ink stains vary by type, ballpoint, fountain pen, or marker, which affects how you tackle them. Hand sanitizer works well on ink stains in carpet and upholstery because the alcohol content breaks down the ink quickly. For permanent marker on wood or fabric, rubbing alcohol or even regular toothpaste can lift the stain. A quick soak in alcohol-based solutions softens the ink to prevent spreading or setting.
- Place a piece of cardboard behind the fabric stain to prevent bleed-through.
- Apply hand sanitizer or rubbing alcohol directly onto the ink stain using a cotton ball or cloth.
- Let the solution sit for 1 to 2 minutes but no longer to avoid fabric damage.
- Gently blot the area to lift the ink; do not rub to avoid spreading.
- Repeat application if needed, then rinse with cold water.
- Launder the garment as usual using cold water and air dry to prevent heat setting.
For ink on wood furniture, apply rubbing alcohol or a small amount of toothpaste, let it sit for a few minutes, then wipe clean. Avoid soaking wood to prevent warping.
Grass and Mud Stain Treatment
Grass stains contain chlorophyll and can be stubborn after drying. Mud is mostly dirt and water, usually easier to remove when fresh. Oxygen bleach solutions are effective for set-in grass stains without harsh chemicals.
- Brush off excess mud once dry to avoid rubbing dirt deeper.
- Mix a solution of oxygen bleach and water (follow package ratios) for soaking.
- Soak the stained garment overnight if the grass stain is set.
- For fresh grass stains, apply a detergent solution with a small amount of white vinegar and let sit for 15, 30 minutes.
- Launder in warm water if the fabric allows; air dry to check stain removal before using heat.
Delaying treatment can strengthen the stain, requiring longer soaking times. Avoid hot water on grass or protein stains to prevent setting.
Blood and Protein-Based Stains
Blood stains are protein-based and can become permanent if treated with hot water or harsh chemicals. Cold water and gentle enzymatic cleaners work best. Hydrogen peroxide combined with dish soap targets blood by breaking down proteins gently.
- Rinse the blood stain with cold water immediately or soak the fabric for 30 minutes.
- Combine one measure of Dawn dish soap with two measures of hydrogen peroxide.
- Dab the stain with this solution and allow it to rest for 15 minutes; test it on a hidden spot before use.
- Blot and then rinse with cold water carefully.
- Launder the garment on a cold cycle and air dry to ensure stain is gone before heat exposure.
Avoid hot water since it can cook the protein into the fibers, making removal nearly impossible later.
Grease, Oil, and Makeup Stains
Grease and oil stains need dissolvers that break down fats. WD-40 can remove stubborn grease stains by loosening oils before washing. Dawn dish soap, designed to cut oils, also cleans makeup stains effectively from fabric.
- Spray WD-40 on the grease stain and let it sit for 30 minutes to penetrate.
- Apply dish soap (like Dawn) directly to the stain and gently rub it in.
- Let the soap sit for at least 15 minutes to break down oils.
- Rinse with warm water if allowed by fabric care instructions.
- Launder promptly on the warmest setting safe for the fabric.
For makeup stains on upholstery, use a sponge dipped in a mixture of 1 tablespoon dish soap and 1 tablespoon white vinegar with 2 cups of cool water, then dab gently. Hairspray is less recommended today due to chemical changes in formulas but may work on older stains by loosening dyes.
Red Wine and Coffee Stains
Red wine and coffee are water-based stains that respond well to dish soap and vinegar blends. Treating still-wet stains promptly improves results. For carpet and upholstery, apply solutions generously but avoid excessive soaking.
- Blot the stain with a clean cloth to remove excess liquid without rubbing.
- Mix 1 tablespoon of dish soap with 1 tablespoon of white vinegar in 2 cups of cool water.
- Apply the mixture with a sponge to the stain and let it sit for 10 to 15 minutes.
- Blot repeatedly with dry cloths to lift the stain out gently.
- Rinse the area with a clean damp cloth and let air dry.
For tougher or set-in stains, repeat the process but avoid using hot water, which can fix these stains permanently in fabrics.
4. Which Fabrics Need Extra Care During Stain Removal?
Delicate fabrics such as silk, wool, and dry-clean-only garments demand gentle stain removal approaches to avoid damage. You want to use mild products, avoid soaking, and always test any treatment on an inconspicuous spot first to check for colorfastness. Understanding these careful steps helps keep your fine fabrics looking their best while effectively removing stains.
Gentle Methods for Silk and Wool
Silk and wool fibers are sensitive to harsh chemicals and excessive moisture. Use cold water and a mild liquid detergent designed for delicate fabrics when treating stains. Avoid rubbing the fabric vigorously; instead, blot gently with a white cloth to lift the stain without spreading it.
Lemon juice and white vinegar can work as natural stain removers, but use them diluted and sparingly to prevent fiber damage. Always limit treatment time to a few minutes and rinse with cold water quickly. Avoid soaking these fabrics to protect their structure and softness.
Handling Dry Clean Only Garments Safely
When a label says “dry clean only,” avoid soaking or scrubbing the item at home. You can try gentle spot cleaning with a damp white cloth and a small amount of mild detergent, but keep moisture minimal. Large or stubborn stains on these items should be handled by a professional cleaner, especially if the garment is vintage, valuable, or made from sensitive materials.
Harsh chemicals and home-use solvents meant for dry cleaning are highly flammable, so avoid using them without professional equipment and ventilation. Choose a hidden seam or inside hem to test a product, checking for fabric or color changes over 10 minutes.
Testing Removers for Colorfastness
Color bleeding or fading is a risk with delicate fabrics. Before applying any stain remover, select a hidden area such as an inside seam or fabric fold. Apply a small amount of the product and wait 5 to 10 minutes, then blot gently to see if any dye lifts or the fabric weakens.
Do not use a remover on a visible stain if discoloration or fabric distortion appears during testing. Always prefer milder products or professional cleaning in these cases. For small stains, a diluted hydrogen peroxide (3% solution) can sometimes be tried, but only after a successful spot test.
Checklist to Avoid Fabric Damage
Keeping delicate fabrics safe while removing stains requires careful handling. Follow this checklist before you start:
- Check the care label for any specific warnings.
- Use cold or lukewarm water only; heat can set stains or shrink fibers.
- Test any stain remover on a hidden area first.
- Blot stains gently with a white cloth to avoid dye transfer or spreading.
- Avoid soaking; limit exposure time to cleaners.
- Choose mild detergents or diluted natural products.
- When unsure, seek professional dry cleaning advice promptly.
Following these steps reduces the chance of accidental damage and maximizes stain removal effectiveness while preserving fabric quality.
When to Use Home Treatments on Delicates
Many minor stains on silk, wool, and dry-clean-only fabrics can be managed at home with careful, mild techniques. Quick blotting and spot-cleaning with diluted detergents or natural products like vinegar are often effective. Avoid repeated treatments or aggressive rubbing, which may weaken the fibers or cause color loss.
On the other hand, large, set-in, or complicated stains on high-value or vintage items are best left to experts. Professionals use controlled spotting with solvents and low-moisture methods that home treatments cannot replicate safely.
5. Building an Essential Stain Removal Kit for Home Use
Keeping a well-stocked stain removal kit at home can save you time, money, and frustration. Essential stain removers don’t have to be expensive or complicated. A simple set of versatile household products combined with a few tools provides an efficient and cost-effective way to tackle most stains on clothing, carpets, and upholstery.
Start with common cleaning agents known for their broad effectiveness: household liquid laundry detergent with enzymes like Tide or Persil, white vinegar, baking soda, and lemon essential oil. Laundry detergent works well on protein-based stains like grass or blood by breaking down the enzymes in the stain, while vinegar and baking soda handle odors and mild discolorations. Lemon essential oil is particularly useful for freshening and breaking down old oil stains when applied in small drops before washing.
Specialty stain removers can help with tough or specific stains, but they’re optional rather than necessary if your kit has these basics. Having a small oxygen bleach powder is a good addition for white or colorfast fabrics to soak stains that resist initial treatment. Avoid mixing different chemical products to prevent toxic fumes and poor cleaning results.
Tools matter as much as the products. Soft-bristled brushes help gently work stain removers into fabric fibers without damage. Microfiber cloths or clean white cotton towels are perfect for blotting and absorbing stains without spreading them. Paper towels are handy for initial blotting, and plastic utensils allow you to scrape off any solid material without pushing it deeper into the fabric.
- Liquid laundry detergent with enzymes (Tide or Persil)
- White vinegar and baking soda
- Lemon essential oil for oil stains
- Oxygen bleach powder (optional, for soaking)
- Soft-bristled brush
- Microfiber or white cotton cloths and paper towels
- Plastic utensils for scraping
Store all your supplies in a small, easy-to-carry bin or caddy. Label bottles clearly and keep them out of direct sunlight to preserve product effectiveness. A dedicated kit stored in one place allows quick access to everything needed the moment a stain happens. Check expiration dates on specialty products yearly. Replace microfiber cloths regularly and launder them without fabric softeners to maintain their absorbency.
Never mix different stain removal products; combining chemicals can create harmful fumes and worsen stains.
The best stain kit creates efficiency but demands proper use. Apply products following manufacturer instructions or reliable home recipes. Blot gently instead of rubbing to avoid embedding the stain or damaging fabric fibers. Treat stains as soon as possible for best results, and wash treated items thoroughly afterward using the appropriate water temperature indicated for the fabric. Avoid drying until stains are fully removed since heat sets stains permanently.
6. Common Stain Removal Mistakes and How to Fix Them
Avoid rubbing stains aggressively because it pushes the stain deeper into the fabric fibers, making removal harder and sometimes causing permanent damage. Instead, gently blot or dab the stain using a clean cloth or paper towel to lift the stain off the surface. For instance, blotting blood or protein stains with cold water prevents them from setting further, whereas rubbing risks spreading and embedding the stain more deeply.
Using the wrong water temperature can worsen certain stains, especially protein-based ones such as blood, egg, or dairy. Hot water causes these proteins to cook and bond with fabric fibers, making stains nearly impossible to remove. Always rinse these stains with cold water first. On the other hand, some stains like tea or fruit stains benefit from hot or even boiling water, but only if the fabric can tolerate it without damage.
Incorrect bleach use often comes from applying too much, using bleach on colored fabrics without proper alternatives, or mixing bleach with ammonia or other cleaners. Mixing bleach and ammonia produces toxic gas, which is dangerous to breathe. When you use bleach, make sure to dilute it and apply it only to color-safe fabrics. Oxygen bleach mixed with cool water is a safer alternative for soaking stubborn stains overnight.
When a stain removal attempt goes wrong, try rinsing the garment again with cold water to wash away any leftover chemicals or residues. Then, soak the fabric in a solution of oxygen bleach and laundry detergent with cool water overnight to loosen set-in stains. Avoid drying the garment until the stain is completely gone because heat from the dryer can set stains permanently. You can also sponge affected spots with rubbing alcohol diluted appropriately, but test on a hidden area first to avoid fabric damage.
- Rubbing instead of blotting spreads stains and damages fibers, blot gently with cold water instead
- Using hot water on protein stains cooks them into fabric, rinse with cold water first
- Applying bleach improperly can cause color loss or toxic gas if mixed with ammonia
- Giving up too soon on set-in stains wastes chances of removal, soak overnight with oxygen bleach and detergent
- Drying stained clothing prematurely sets stains, always confirm stain is fully removed before drying
Focus on the correct treatment for each stain type and fabric to avoid these pitfalls. Always double-check cleaning agents for compatibility and test on small areas first. Following these steps reduces the risk of making stains worse and helps maintain fabric integrity while increasing your chances of complete stain removal.
7. How Long Should I Let Stain Treatments Work Before Washing?
Letting stain treatments sit for the right amount of time before washing boosts their ability to break down stains without harming your fabric. Different stain removers and stains demand different wait times, from a quick 30-second peroxide bubble to soaking for an hour or more. Overexposing fabric to strong chemicals like peroxide can cause fading, so knowing when to rinse or let the solution work longer is important.
Deciding whether to rinse immediately or let the treatment soak depends on the stain type and fabric. For delicate fabrics or when using hydrogen peroxide, shorter contact times such as 10 to 15 minutes are safer. For tougher stains like oil or grass, a longer soak of 20 minutes up to an hour can be necessary to allow the enzymes or soap to break down the stain. Rinsing cold water beforehand also helps flush out loosened stain particles, improving cleaning results.
| Stain Type | Treatment | Recommended Time | Rinse or Not? |
|---|---|---|---|
| Blood or Protein Stains | Apply enzyme or detergent | 20 minutes to 1 hour | Rinse before laundering |
| Peroxide-Safe Stains (light-colored) | Hydrogen peroxide | 10-15 minutes (max) | Rinse with cold water then wash |
| Grass Stains (on shoes or clothes) | Detergent scrub, then soak | 15 minutes soak | Rinse before drying |
| Oil/Grease Stains | Baking soda, peroxide, soap mix | 30 minutes to 1 hour | Rinse before wash |
| Colored Clothing with Stains | Soak white clothes | 15-30 minutes | Rinse afterward |
| General Stains | Liquid laundry detergent | 5 minutes pre-soak | Wash directly |
Look for signs that the stain treatment has done its job before laundering, such as visible fading or a change in stain texture. If the stain still looks dark or raised, retreat the area rather than washing immediately. Avoid letting peroxide sit beyond 15 minutes on colored or delicate fabrics to prevent discoloration. For enzyme or detergent treatments, soaking up to an hour is usually safe, but more prolonged exposure could weaken fibers.
For fast-acting solutions like applying hydrogen peroxide and blotting after 30 seconds, rinsing right away prevents excess chemical damage. Other treatments that rely on soaking, like enzyme cleaners for grass or protein stains, perform best after at least 20 minutes. Testing on a hidden fabric spot also helps confirm safe soak times for your item. By adjusting wait times and rinse steps according to the stain and fabric, you improve the chance of full removal without fabric damage.
8. When Should You Call a Professional Cleaner Instead?
Some stains and fabrics demand professional cleaning to avoid permanent damage or setting the stain deeper. Delicate materials like silk, suede, or leather often require expert care because home treatments can cause discoloration, shrinkage, or texture changes. Stubborn stains such as ink, red wine, or oil that have been left untreated for days may also need professionals who have access to stronger solvents and specialized equipment.
Deciding if a stain is beyond home removal depends on several factors. If you’ve tried appropriate treatments carefully without success, the risk of worsening the stain or harming the fabric increases. Also, consider how valuable the item is or whether it has delicate trims or linings. Stains on large upholstery pieces or carpet that covers significant floor areas usually justify calling a cleaner to avoid costly replacements.
Professional cleaning costs vary widely, often ranging from $20 to $100 per item for clothing or small household fabrics, and $100 to $300 or more for larger furniture or carpet areas. While hiring pros costs more than DIY methods, benefits include using industrial-grade stain removers, avoiding damage, and receiving expertise, especially with unknown fabric types or tricky stains. Some services offer spot treatments only, while others provide full cleaning and fabric protection.
Preparing an item for the cleaner helps improve results. Avoid applying multiple home stain removers that might conflict with professional chemicals. Store the stained fabric in a breathable bag or container and note the stain’s origin, when it happened, and any treatments applied. This information enables cleaners to choose the best process.
- Stains on delicate fabrics like silk, wool, or leather
- Stubborn, set-in stains after several home attempts
- Large or heavy items difficult to treat at home
- Unknown fabric composition or unclear stain type
- Expired or damaged professional guarantees (to preserve value)
Always be honest and detailed when explaining stain history and home treatments to your cleaner; it saves time and prevents chemical conflicts.
Using this checklist helps you weigh whether to call a professional cleaner. Knowing cost factors and benefits will guide your expectations and avoid costly mistakes. Professionals can often restore fabrics better and extend their life, but evaluating the situation carefully helps you make the best choice for preserving your items.
Step-by-Step Action Plan for Effective Stain Removal
Follow these steps to tackle most stains confidently and increase your chance of success.
- Immediately after the spill: Blot the stain gently with a clean, dry cloth to absorb as much liquid as possible without spreading it.
- Within 15 minutes: Identify the stain type and apply the appropriate household cleaner based on common stain types.
- After treatment application: Let the stain remover sit for 5 to 15 minutes but not longer than 30 unless the fabric can tolerate it and the product label allows.
- Before washing: Check fabric care labels to confirm safe washing temperature and method that won’t damage the material.
- During washing: Use the warmest water safe for the fabric and an appropriate detergent, then inspect the stain before drying.
- After washing: If the stain remains, repeat treatment and wash again instead of drying, since heat can set stains permanently.
- Within 24 hours: Treat delicate fabrics cautiously or seek professional cleaning advice if the stain persists.
Frequently Asked Questions
Can I Use Fabric Protectant Sprays to Prevent Future Stains?
Yes, treating clean fabrics with fabric protectant sprays can help prevent future stains by creating a barrier. Apply according to product instructions only after fully cleaning and drying the item to maintain effectiveness.
Is Hydrogen Peroxide Safe for Colorfast Fabrics in Stain Removal?
Hydrogen peroxide at 3% concentration is generally safe for colorfast fabrics and can help pre-treat stains effectively. Always test it on a hidden area first to avoid discoloration.
How Do I Remove Blood Stains from Carpet?
Saturate blood stains with 3% hydrogen peroxide and blot them with clean cloths until gone. This method helps break down the proteins in blood for easier removal.
What’s the Best Way to Clean Tomato Sauce Stains?
Use a clean, white, lint-free cloth to gently blot tomato sauce stains, soaking up the liquid carefully to prevent spreading. Rubbing the stain can embed it further into the fabric.
How Can I Remove Slime Stains from Fabric?
Rinse slime stains with 2 gallons of hot tap water in a dishpan to dilute and loosen residues. Follow by blotting with a clean cloth to lift remaining slime.
How to Lift Permanent Marker Stains from Leather?
Treat permanent marker stains on leather quickly using white vinegar on a clean, damp cloth. Dab gently rather than scrubbing to avoid damaging leather texture.
Key Points to Remember
Cleaning stains effectively starts with prompt action and matching treatments to the stain type and fabric. Handle tough or delicate stains carefully to avoid damage. Try treating a recent stain yourself with the right product and timing, and you’ll improve your home’s fabric care with each effort.